

This is the second part of a series I am writing about using Badges and Hyperdocs in my ICT class. Part 1 can be found here.
Initially, I was convinced that Google Slides was the best platform for a BadgeDoc. I liked that multiple kinds of media could go on a slide and that I could link to individual slides easily. The layout guides were also a useful feature. I even got as far as creating a Google Slides BadgeDoc for a coding unit I was teaching with Scratch and a Google Slides Evidence Doc to go with it. But in the end, I wasn’t convinced that Slides would be the easiest way for my students to navigate the content they needed to learn, and I couldn’t figure out a simple workflow for assigning badges.
I decided that Google Sites was the best way to organise the content I wanted my students to learn, and the more I worked with it the more I liked it. My final WebAuthoring BadgeSite looks like this (click the image to go to the actual site):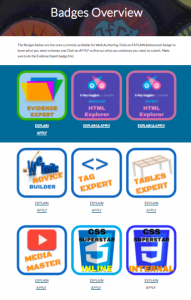 Google Sites won me over because of how easy it was to insert multiple kinds of media (including Google Docs and Slides) into 1 place and then publish this information so it can be accessed via a URL. The layout tools available in Sites were ok (not great), and I would have liked to be able to link to part of a page (not just the whole page) but to me, these were not deal breakers.
For the student’s evidence document I decided to stick with a Google Docs as it was the easiest to structure.

The first column of the document included an overview of what was to be learned and links to the BadgeDoc. Borrowing from the Hyperdoc framework I organised this information in Explain and Apply sections. The second column was where the students would put their evidence of learning and the third column was where I would put the badge once it was earned.
For student Evidence I decided that it had to be a combination of screenshot or screencast combined with a link to their work. The screenshot gave me a quick overview of what they had done, and the link took me directly to their work with as little lost time as possible. To make sure the students knew how to submit evidence I created an Evidence Expert badge as the first one they had to do. This badge taught them how to use the Nimbus Screenshot Chrome Extension and how to add a hyperlink to an image in Google Docs.
For creating badges I used Google Drawings and for distributing badges to the student evidence docs I used Google Keep. I first downloaded the badges as .png files and then uploaded each one to a Google Keep note. I discovered that if I pinned each of the badge notes they would show up as the top notes whenever I opened Keep in the sidebar of an Evidence Doc, making it easy to drag and drop badges into the students’ evidence tables.

To assign the Evidence Doc and keep track of student progress I used Google Classroom. I set up an assignment that made a copy of the Evidence Doc for each student and told them that once they had completed a badge they needed to submit the assignment. This gave me an easy way to track and assign badges. Once an assignment was submitted I would get an email notification and could immediately access the student Evidence Doc. Once in the doc I could submit the student’s evidence quickly and either assign a badge or leave them a comment explaining what they still had to do. I also had the option of leaving them a comment when I returned their work. The best part was the overview Classroom gave me of who had submitted and was waiting for their badge, who had not submitted, and whose work had been returned.

An added bonus of using Classroom was that I could directly import grades from the Forms I was using to check student understanding.
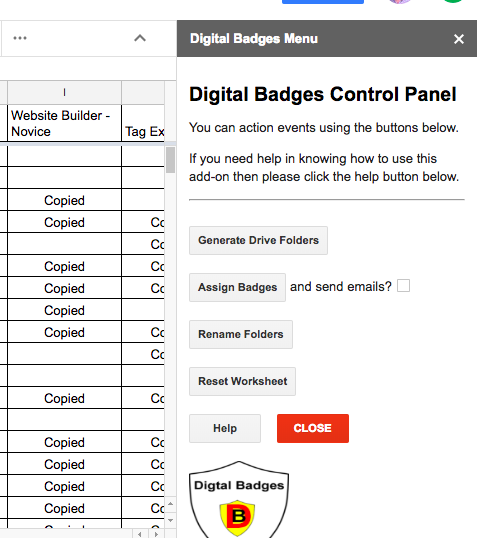
For the final piece of the puzzle I used a Google Sheets Add-on for awarding badges. After trying every Google badging extension and add-on I could find I finally discovered the Digital Badges Sheets Add-On. I was starting to lose hope before I discovered this add-on, and it saved me. Essentially, with this add-on, I was able to turn my Google Drawing badges into pdf badges that were delivered straight to folders in my students’ Google Drive accounts. It was easy to set up, and easy to assign badges via the well-designed sidebar that opens when you run this add-on.
The details of how I set up this Add-on will be the focus on Part 3 of this series. But before wrapping up I wanted to mention the part I find the most exciting. With a little bit of spreadsheet work, I was able to link the Digital Badges sheet to, what I call, a Mentor Board that could be embedded in the BadgeSite.
 The way I framed this with my students was that the Mentor Board was where they could go looking for help. My hope was that if someone was stuck they would go and ask someone who already had the badge they were working on for help before they asked me.
That is all the pieces. There are a lot of them and managing them all tool more clicks than I would like. However, I think that in general the workflow was about as frictionless as possible, using the tools at available to me. A possible next step would be to try and automate some of the ‘clicks’ using a Chrome extension or another Sheets Add-on.