
This year I purchased a 3D printer for my classroom. Our PrintrBot Simple Metal has been going flat out all year trying to keep up with our project ideas. So far it has printed trophies for our Mindstorms SumoBot competitions , Bugging Eyeballs for Halloween, Gameboard pieces for a Science Gameboard project, various attachment pieces for my classroom, and the student prototypes and final designs for our new Design 7 unit: Made in Space.
The inspiration for the Made in Space Unit was the Future Engineers competition that challenged students to design and model a useful tool that could be printed on the 3D printer aboard the International Space Station. Being in Canada we were not eligible to compete but we decided to try the challenge anyway, and being an IB MYP School we used the new MYP Design Cycle to help guide our efforts.
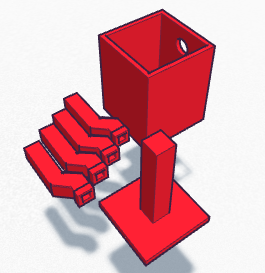
The student’s used TinkerCad to create their 3D models and we printed out scaled down prototypes, as well as final models. The student’s really worked hard and came up with some great ideas and models. I have included one below, but the rest can be found on our class blog.
There is lots of room to improve this unit, but in general I thought it was quite successful. I have shared my unit materials below in case it is of interest to anyone else trying to use a 3D printer in their classroom. Any and all feedback would be much appreciated.
Tiana’s Plant Watering System – DESCRIPTION
Note: Our workflow was based on Google Docs and Classroom, and all the work was done on Chromebooks.
Inquiry and Analysis
We watched some videos on 3D printing and the Future Engineers challenge and then the students spent about 4 class periods researching and thinking about 3D printing in space. They used the following GDoc to guide their efforts:
Inquiry and Analysis – Made in Space
Developing Ideas
In order for them to try and depict their design ideas in 3D We spent 2-3 class periods practicing Isometric Drawing. I used some of the tutorials from Technology Student.
Their design work was all done with pencil, paper and ruler (usually). They used the following GDoc to guide their efforts:
Developing Ideas – Made in Space
A colleague of mine also created these worksheets to guide students through the steps of learning to draw in 3d and use TinkerCad: Drawing Lessons
Creating the Solution
To learn TinkerCad all the students worked through these 2 tutorials:
Getting Started with TinkerCad
Starship Jr Tutorial
They then created a scaled down prototype that we could print. Following their analysis of the prototype they were able to make some changes and resubmit their model final printing.
To make printing easy I shared a google folder with them (the link went in the About page of our Google Classroom). To submit their model for printing they had to export it as a .stl file and upload it to the shared folder. On the computer attached to the printer it was then easy to download the model from the shared folder and print it.
Planning and documentation of their creation process was done in this GDoc:
Creating the Solution – Made in Space
Proof was in the form of screenshots or photos.
Evaluating
Finally the students evaluated their models my comparing them to the design specifications. Unfortunately, I was unable to print out all their models before the evaluation (some caused me more grief than others). They used this GDoc to guide their evaluation work:
That’s it. Next week we will be celebrating this unit by inviting parents in to see the student’s models and talk to them about their design process.
Extremely thorough and useful description of your process–thank you for taking the time. I plan to pass this along to some of my teachers who are looking for ways to start using our 3D printer.